

You have the talent. You have the tracks. But right now, you're stuck staring at a login screen that won't budge or a "401 Unauthorized" error that's killing your momentum. It’s a total buzzkill. We get it. You didn't start a station to become a network engineer; you started it to be heard. Finding the right shoutcast hosting login setup shouldn't feel like cracking a safe.
Ready to stop troubleshooting and start streaming? This is your definitive guide to mastering the ReliaStream dashboard. We're going to bridge the gap between your local encoder and the server. Whether you're navigating the classic Centova Cast interface or the modern MediaCP layout, we have the answers. We'll walk through finding your exact login URL, starting your Auto DJ, and securing that beautiful "On Air" status. No more technical excuses. Let's get you live.
Key Takeaways
- Stop hunting for credentials. Learn to distinguish your billing portal from your radio control panel to find your server IP and admin password instantly.
- Choose your dashboard. Whether it's the veteran Centova Cast or the modern MediaCP, we help you pick the right tool for the job.
- Master your shoutcast hosting login setup and get your Auto DJ humming. Keep your station on-air 24/7 without keeping your local hardware running.
- Connect your encoder without the headaches. Eliminate "401 Unauthorized" errors and bridge the gap between your studio and your listeners.
- Future-proof your broadcast with SSL security. Ensure 100% compatibility with Chrome and Safari by securing your radio link today.
Finding Your ShoutCast Hosting Login: Where to Start?
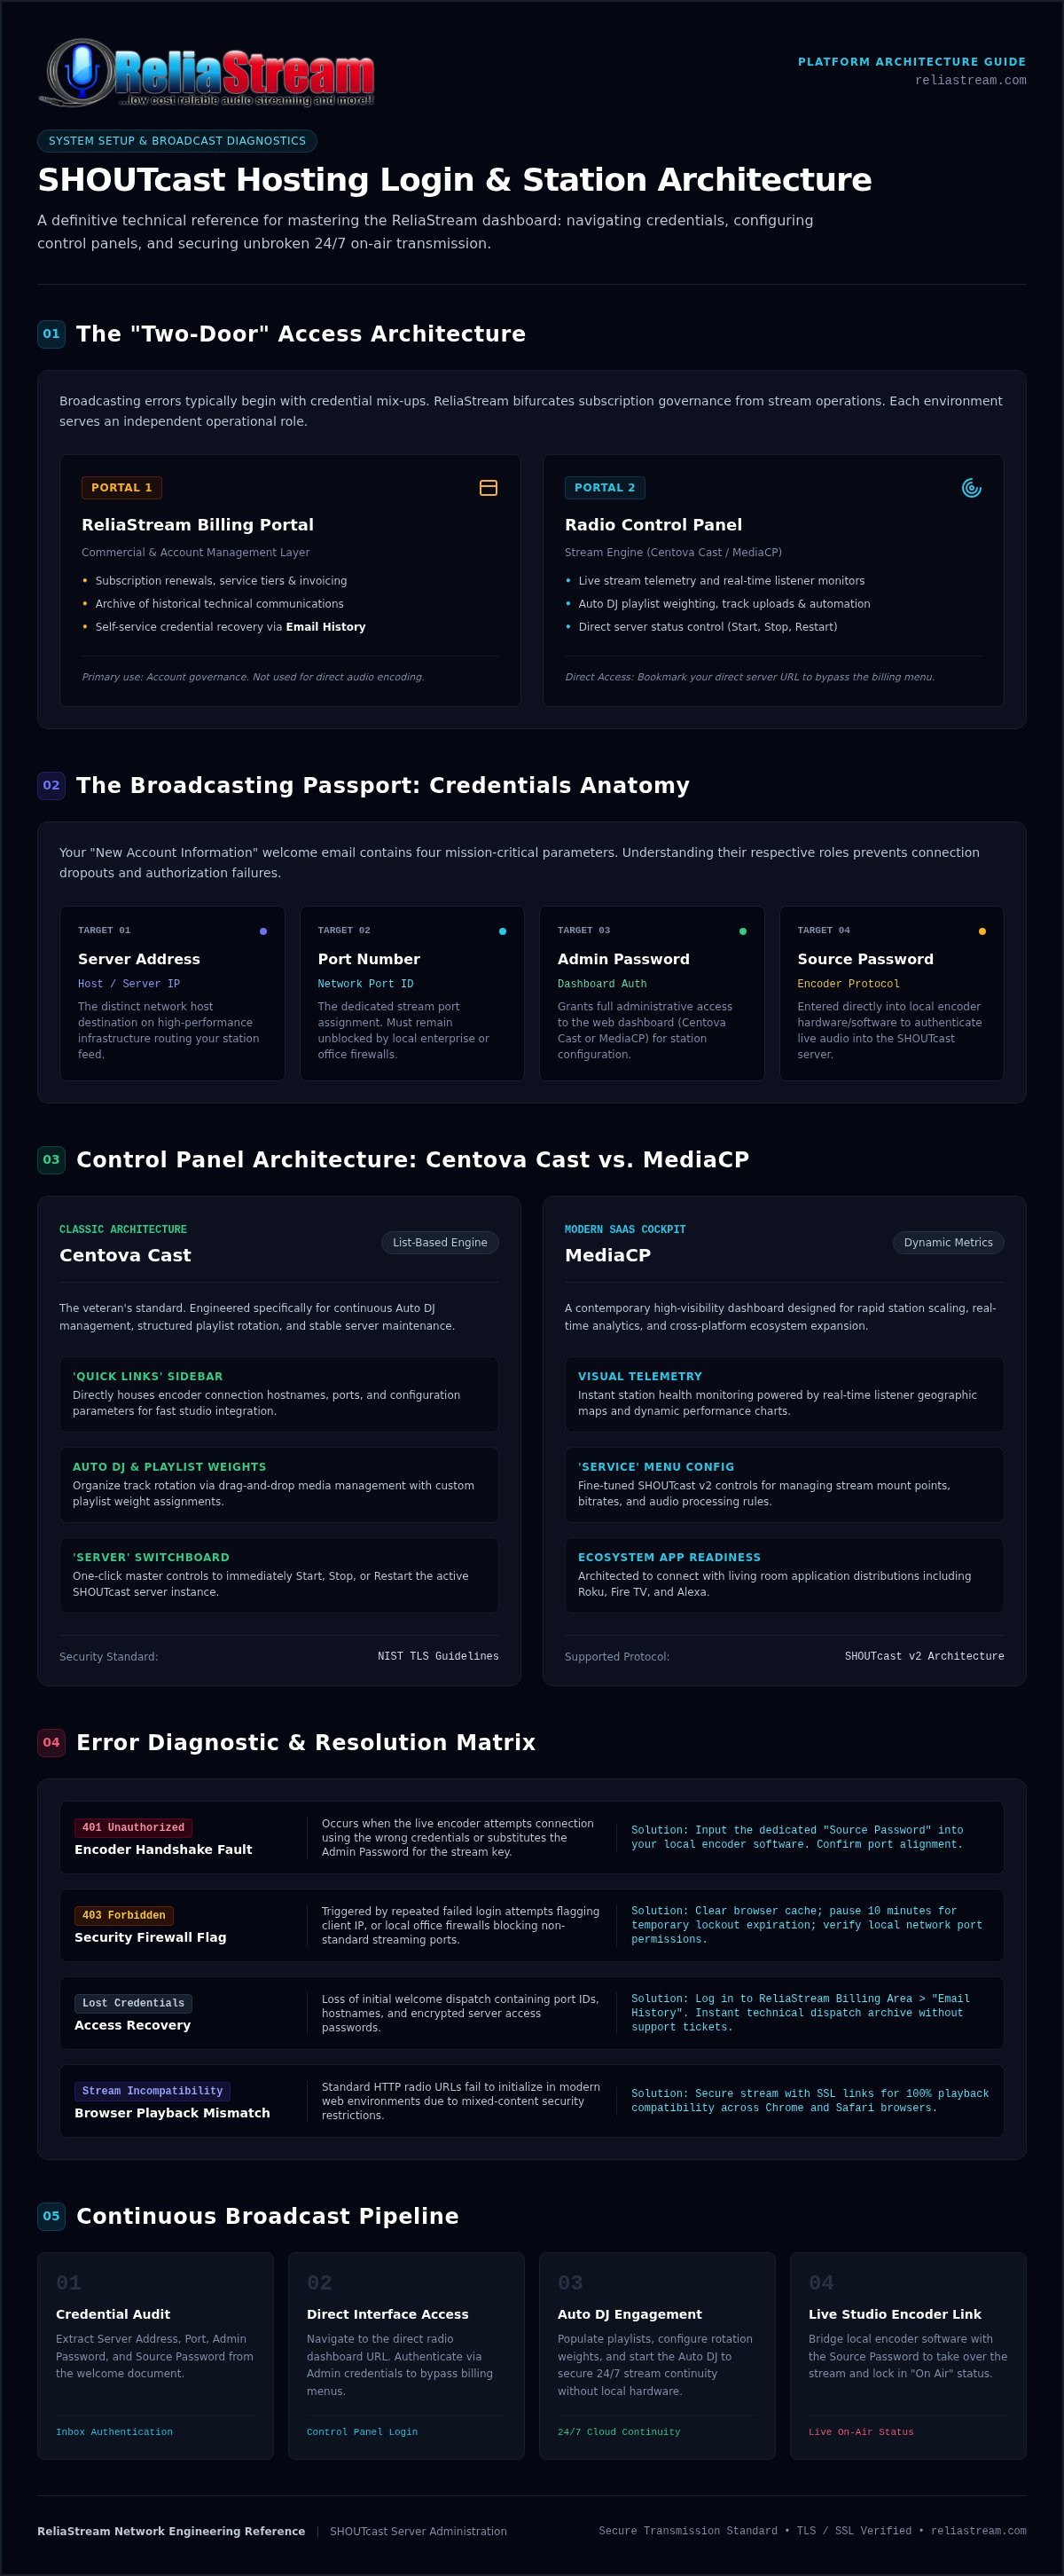
You've secured your plan and you're ready to hit the airwaves. But there's a common roadblock that trips up even the most eager broadcasters: the "Two-Door Problem." To master your shoutcast hosting login setup, you must understand that your ReliaStream billing area and your actual Radio Control Panel are two different worlds. One handles your subscription and invoices. The other is the engine room where you manage playlists, track listeners, and kickstart your Auto DJ. Mixing these up is the fastest way to get a login error before you've even uploaded your first MP3.
The Welcome Email: Your Broadcasting Passport
Check your inbox for the "New Account Information" email. This document is the holy grail of your station. It contains your Server Address, your Port Number, and your specific passwords. Understanding SHOUTcast streaming technology requires knowing how these pieces fit together. Your "Admin" password gets you into the web dashboard (Centova Cast or MediaCP), while your "Source" password is what you'll eventually plug into your encoder software to go live. The Port Number is the unique identifier for your stream's location on our high-performance servers. Keep this email safe. Treat it like the keys to your studio.
Direct Access vs. Client Portal Login
Speed is everything. While you can access your radio panel through the ReliaStream client portal, the pros bypass it entirely. Bookmark the direct URL provided in your welcome email. This allows you to jump straight to your dashboard without navigating through billing menus. If you encounter a "403 Forbidden" error, don't panic. This usually happens if you've entered the wrong credentials too many times and our security system has temporarily flagged your IP. Clear your browser cache or wait ten minutes before trying again. Also, ensure your local network isn't blocking the specific port assigned to your station, as some office firewalls are picky about non-standard web ports.
Lost your credentials? It happens to the best of us. ReliaStream uses a no-nonsense recovery process. Simply log into your billing area and click on "Email History." We archive every technical detail we've ever sent you right there. You don't need to wait for a support ticket; your data is always at your fingertips. Get those details ready, because once you're logged in, it's time to choose the interface that will power your professional sound.
Centova Cast vs. MediaCP: Navigating Your Setup
Choice is power. We don't believe in one-size-fits-all solutions. That's why ReliaStream offers both Centova Cast and MediaCP. Your specific shoutcast hosting login setup depends on the engine under your station's hood. One is a classic workhorse; the other is a high-tech cockpit. Both get the job done. You just need to know which levers to pull. Not sure which one you have? Check your welcome email or look at the logo in the top-left corner of your dashboard. Centova has a traditional list-based feel, while MediaCP looks like a modern SaaS application.
Centova Cast Layout Essentials
Centova Cast is the veteran's choice. It’s built for broadcasters who live in their Auto DJ library. To get moving, look for the 'Quick Links' section on the left sidebar. This is where your encoder settings live. You'll find the hostnames and ports needed to connect your studio. Managing media is just as direct. Drag and drop your tracks into playlists, set your rotation weights, and you're ready. When you need to go live or update settings, the 'Server' tab is your main switch. Use it to start, stop, or restart your ShoutCast instance with a single click. We ensure every login portal follows the NIST guidelines for Transport Layer Security to keep your credentials and your stream data locked down tight.
MediaCP Dashboard Highlights
MediaCP is the high-energy interface for the modern era. If you love sleek charts and real-time listener maps, this is your home. The overview page gives you a bird's-eye view of your station's health instantly. Configuring ShoutCast v2 is handled under the 'Service' menu, where you can tweak your mount points and bitrates with ease. MediaCP excels at expansion. It’s designed to work seamlessly with our radio streaming app development services. This makes it easier than ever to push your station onto Roku, Fire TV, and Alexa. It’s about more than just audio; it’s about presence. If you're looking for a panel that grows with your brand, check out our MediaCP plans to see the difference in action. Whether you choose the veteran reliability of Centova or the modern flash of MediaCP, the goal remains the same: a perfect broadcast every time.
Step-by-Step ShoutCast Server Setup
You've got the keys. Now, let’s build the engine. A solid shoutcast hosting login setup is only as good as the configuration behind it. Start with the basics in your dashboard: Title, Genre, and URL. This isn't just metadata. It’s how your audience finds you in global directories. It’s your brand’s digital footprint. Don't skip the "Genre" tag; it's the primary way listeners discover new stations on the ShoutCast directory. Fill these out, save your changes, and prepare for the heavy lifting.
Configuring the Auto DJ
Why let the silence win? Auto DJ is the backbone of low bitrate radio hosting, keeping your stream alive when you're away from the mic. Set your crossfade to 2 or 3 seconds for that polished FM feel. Shuffle your tracks to keep the rotation fresh and unpredictable. Once you activate the Auto DJ, your station becomes a 24/7 broadcasting machine. It’s the ultimate "set it and forget it" tool for busy creators who prioritize consistency. No more dead air. Just results.
Managing Your Media Library
Organization is your best friend. Use the built-in File Manager for quick uploads. Fire up an FTP client like FileZilla for those massive music collections. Group your tracks into 'Heavy Rotation' for the hits and 'Scheduled Events' for jingles or top-of-the-hour IDs. 128 Kbps MP3s are the 'sweet spot' for Auto DJ storage because they balance high-fidelity sound with efficient disk space usage. This ensures your library stays lean without sacrificing the listener experience. Keep your filenames clean and your folders logical. It saves hours of troubleshooting later.
Don't forget the DJ accounts. You need these to transition from recorded content to a live broadcast without the stream dropping. It tells the server to "fade out" the automation and "fade in" your live feed seamlessly. This is the secret to a professional broadcast flow. Finally, hit that 'Start' button. If your status turns green, you're officially on the map. Ready to test the limits? Before you go full throttle, check the FCC Broadband Speed Guide to ensure your local upload speed can handle your chosen bitrate without stuttering or dropouts. Your shoutcast hosting login setup is now a living, breathing station. Let's get to the encoder.
Connecting Your Encoder: The Final Login Step
An encoder is the heart of your live broadcast. It is the software bridge that captures your microphone and music, converts it into a digital stream, and pushes it to our servers. Without it, you are just talking to yourself in an empty room. You have plenty of options here. The veteran crowd often sticks with SAM Broadcaster for its deep automation, while others prefer the classic Winamp with the DSP plugin. If you want something lightweight and incredibly reliable, BUTT (Broadcast Using This Tool) is our top recommendation. It is simple, open-source, and does exactly what it says on the tin.
Before you hit that connect button, remember the Golden Rule of ShoutCast. Never try to stream live while your Auto DJ is in "Exclusive" mode using the master source password. If you do, the server will reject you every single time. To go live without stopping the music manually, you must use a DJ account. This tells the server to transition control from the automated playlist to your live feed. It is the difference between a professional hand-off and a clumsy technical glitch. Accuracy is everything. Your server IP, Port, and Source Password must be entered exactly as they appear in your shoutcast hosting login setup documentation.
Common Encoder Configuration Errors
Stuck on "Connection Refused"? This is usually a classic firewall block or a simple port typo. Double-check that you aren't accidentally using your web panel port for your encoder. If you see an "Invalid Password" prompt, verify your DJ account status in the control panel. Another silent killer is the bitrate cap. If your encoder is set to 320 Kbps but you are on a radio hosting starting at $1.99 plan limited to 128 Kbps, the server will drop your connection immediately. Keep your settings within your plan limits to maintain a stable signal.
Transitioning from Auto DJ to Live Voice
Transitioning should be smooth. While you can use the "Kick" function in Centova Cast to force the Auto DJ off the air, using a dedicated DJ port is the professional way to fly. This allows for a seamless crossfade where the music ducks and your voice takes over. No "pops." No silence. Just a clean broadcast. Always monitor your levels before you open the mic. You want your voice to sit on top of the music, not be buried by it. Ready to put your station on the map? Explore our professional ShoutCast plans and start your live journey today.
Securing and Scaling Your Professional Stream
You've nailed the shoutcast hosting login setup. Your station is live. The music is flowing. But is your stream actually reaching your audience? In 2026, a live signal isn't enough. If your stream isn't secure, it's invisible to half the internet. Modern browsers have declared war on unencrypted media. If you want to grow from a bedroom broadcaster to a professional powerhouse, you need to think about security and scale. This is where you separate the amateurs from the icons. Your initial shoutcast hosting login setup was just the beginning of the journey.
The Importance of SSL Links
Let's talk about the silent audience killer: mixed content blocking. Chrome, Safari, and Firefox now block HTTP audio streams embedded on HTTPS websites. If your station site is secure but your stream isn't, your play button does nothing. This is why ssl radio streaming is mandatory. ReliaStream includes built-in SSL links with our plans to save you from this technical nightmare. You just need to update your website's player code with the secure URL found in your dashboard. It takes two minutes. It saves your entire listenership. Don't let a "Not Secure" warning drive your fans away.
Ready for the Big Leagues?
Scaling is about more than just security. It's about presence. Keep a close eye on your listener statistics in your control panel. If you're consistently hitting your listener limit or seeing high demand for better audio quality, it's time to bump up your bitrate. We offer tiers from 32 Kbps all the way to 320 Kbps for audiophile-grade delivery. As you grow, you might wonder about shoutcast vs icecast for specific directory needs, but ShoutCast remains the king of ease of use. Presence matters as much as performance.
Ready to dominate the living room? Audio is everywhere. You aren't limited to web browsers anymore. Talk to the ReliaStream team about launching a custom Alexa Skill, Roku Radio App, or Amazon Fire TV App. These aren't just toys. They are professional tools that put your station on the biggest screens and smartest speakers in the house. Before you push for your first 1,000 listeners, run through your final checklist. Is the Auto DJ humming? Is the SSL link active? Is your bitrate optimized? If the answer is yes, you're ready. The airwaves are yours. Go take them.
Time to Hit the Airwaves
You've mastered the distinction between your billing portal and your radio dashboard. You've configured your Auto DJ for 24/7 reliability and successfully connected your live encoder. Your shoutcast hosting login setup is no longer a technical hurdle; it is your launching pad. Whether you are running a lean 128 Kbps stream or pushing high-fidelity audio at 320 Kbps, you now have the blueprint to keep your station humming 24/7. No more "401 Unauthorized" errors. No more silent streams.
ReliaStream has been the authoritative veteran in this space since 2008. We provide the reliability you need and the gritty, proactive support you deserve. Every plan includes SSL-secured links to ensure your listeners never face a blocked stream on modern browsers. You have the talent and the tools. Why wait another minute? Ready to dominate the airwaves? Pick your ReliaStream plan and get on-air today! Your audience is out there. It is time to go live and make some noise.
Frequently Asked Questions
How do I find my ShoutCast server login URL?
Check your "New Account Information" welcome email from ReliaStream. This message contains the direct link for your specific control panel. If you've lost the email, log into our billing portal and navigate to your email history. We archive every technical detail we've ever sent you. Bookmarking this direct URL is the first step to a successful broadcast. It allows you to skip the billing area and jump straight into the engine room.
What is the difference between the Admin password and the Source password?
Think of them as two different keys. Your Admin password unlocks the web dashboard (Centova Cast or MediaCP) where you manage files and playlists. The Source password is for your encoder software to push live audio. If your Auto DJ is active, you must use specific DJ account credentials instead of the master source password. This ensures the server can "hand off" the stream from automation to your live voice without any technical glitches.
Why can't I connect my encoder to the ShoutCast server?
Connection failures usually stem from firewall blocks, incorrect port numbers, or password typos. Double-check that your encoder is using the assigned ShoutCast port, not the web dashboard port. If your encoder is set to a higher bitrate than your plan allows, the server will reject the connection. Also, verify that your local network isn't blocking the stream. Many office firewalls restrict the non-standard ports used by streaming servers, causing a "Connection Refused" error for new broadcasters.
Can I change from Centova Cast to MediaCP after setup?
Switching is possible, but it isn't a one-click process. Centova Cast and MediaCP use different database structures, so your playlists and media library won't automatically move. If you want the modern analytics and smart TV features of MediaCP, reach out to our gritty support team. We can set up a new instance for you. This allows you to modernize your station while we help you manage the technical migration of your audio files and station assets.
What port does ShoutCast use for hosting login?
There is no single universal port for every station. Your specific port number is generated during your shoutcast hosting login setup and is clearly listed in your welcome email. While port 8000 was a legacy standard, modern professional hosting uses a wide range of ports to ensure stability. You can always find your current port and hostname in the "Quick Links" or "Settings" section of your Centova Cast or MediaCP dashboard before configuring your encoder.
How do I set up Auto DJ to play music when I'm not live?
First, upload your MP3 files using FTP or the dashboard's file manager. Next, assign those tracks to a playlist and set your rotation weights. Once your media is organized, click the "Start" button in your control panel to activate the automation. This keeps your station on-air 24/7 without needing your local computer to stay running. It is the most reliable way to maintain a professional presence for your global audience while you are away.
Do I need a static IP address to host a ShoutCast station?
You definitely don't need a static IP at your studio. ReliaStream handles the heavy lifting by providing a professional, fixed IP address on our high-performance servers. Your local connection only needs to be stable enough to upload your audio data. Whether you're on a home cable line or a fiber connection, our servers will stay at the same address. This makes it easy for your listeners to find and bookmark your station for consistent playback.
What happens if I exceed my plan's bitrate during setup?
If your encoder bitrate exceeds your plan's limit, the server will automatically disconnect your stream. This is a critical part of the shoutcast hosting login setup process. If you're on a 128 Kbps plan but try to stream at 320 Kbps, the ShoutCast DNAS will reject the source. Always ensure your encoder settings match your ReliaStream plan. If you need more quality, you can upgrade your bitrate tier instantly through our billing portal to avoid any service interruptions.


